Deploying a Spring Boot Application with Flightcontrol
In this guide, we will take an existing Spring Boot application and deploy it to Amazon Web Services (AWS) with Flightcontrol. You will need to have a working Spring Boot application first. If you need an example project, create a new application with the Spring Initializr.
At the end of this tutorial, we will have a Spring Boot application running on AWS Elastic Container Service (ECS) Fargate and an AWS Relational Database Service (RDS) database. This web application will have a publicly accessible URL, running on resources in your own AWS account.
We are going to use the Nixpacks build pack for Java to create a Docker image from your source code and then deploy that image as a Fargate task.
Prerequisites
You’ll need the following before you begin:
- A working Spring Boot application to deploy (either Gradle or Maven) (Note: Java 20 is not yet supported)
- A Git repository (public or private) with the Spring Boot application
- An AWS account - Create an account
- A Flightcontrol account - Create an account
Flightcontrol Specific Requirements
There are two important things to take care of with your project first:
Using a DATABASE_URL Environment Variable
There is one addition you will need to make to the source code of your application. Flightcontrol will provision a database for your application, and the connection string for that database will be available in the DATABASE_URL environment variable. The DATABASE_URL URL format is not the same as the JDBC URL format that Spring Boot expects.
You can keep the data source URL in your application.properties file for developing on your local environment, but we will need to override this URL when we deploy with Flightcontrol.
The following class transforms the DATABASE_URL environment variable to the JDBC URL format. You can add this configuration class to your Spring Boot application.
package dev.flightcontrol.springbootmaven;

import org.springframework.boot.jdbc.DataSourceBuilder;
import org.springframework.context.annotation.Bean;
import org.springframework.context.annotation.Configuration;

import javax.sql.DataSource;
import java.net.URI;
import java.net.URISyntaxException;

@Configuration
public class ApplicationConfiguration {

    @Bean
    public DataSource getDataSource() throws URISyntaxException {
        DataSourceBuilder builder = DataSourceBuilder.create();

        // Use the DATABASE_URL environment variable, if it exists
        String databaseURL = System.getenv("DATABASE_URL");
        if (databaseURL != null) {
            String jdbcURL = getSpringDataSourceURL(databaseURL);
            builder.url(jdbcURL);
        }
        return builder.build();
    }

    private String getSpringDataSourceURL(String databaseURL) throws URISyntaxException {
        URI uri = new URI(databaseURL);
        String username = "";
        String password = "";
        String userInfo = uri.getUserInfo();
        if (userInfo != null) {
            String[] components = userInfo.split(":");
            username = components[0];
            if (components.length == 2) {
                password = components[1];
            }
        }
        String host = uri.getHost();
        int port = uri.getPort();
        String path = uri.getPath();
        String scheme = uri.getScheme();
        if ("postgres".equals(scheme)) {
            scheme = "postgresql";
        }
        String jdbcURL = "jdbc:" + scheme + "://" + host + ":" + port + path;
        if (!username.equals("")) {
            jdbcURL = jdbcURL + "?user=" + username;
            if (!password.equals("")) {
                jdbcURL = jdbcURL + "&password=" + password;
            }
        }
        return jdbcURL;
    }
}
An alternative would be to manually set a SPRING_DATASOURCE_URL environment variable through the Flightcontrol dashboard, based on the value of the DATABASE_URL environment variable that Flightcontrol provides.
One important thing to note is that Spring expects postgresql as the database scheme instead of postgres in the DATABASE_URL environment variable. For instance:
jdbc:postgresql://localhost:5432/mydb?user=myuser&password=mypasswordYou should continue to set other database properties in your application.properties file, such as the database dialect and any Hibernate properties.
Gradle-Specific Instructions
As of Spring Boot 2.5.0, Gradle builds now produce two JAR files - one that is executable, and one that is plain. Flightcontrol (through Nixpacks) will try and run both JAR files, so it is best to only produce the executable JAR file. This means that you will need to add the following to your build.gradle file:
tasks.named("jar") {
	enabled = false
}
For more information on what Spring Boot is doing, see the Spring Boot docs on Executable and Plain Archives
Maven-Specific Instructions
When using the Maven builds created from the Spring Initalizr, there are no specific steps you need to take to deploy with Flightcontrol.
Connecting Flightcontrol to AWS and GitHub
After you have created your Flightcontrol account, you’ll need to connect your AWS and a Git provider account. The AWS account will be used to create the infrastructure for your Spring Boot application. Your Git provider account will be used to deploy your Spring Boot application to AWS.
If you’re using GitHub, you can choose to provide access for Flightcontrol to selected or all repositories. If you choose to provide access to selected repositories, you’ll need to select the repository that contains your Spring Boot application. For more, see our guide to Connecting GitHub.
Creating a Flightcontrol Project
Once you connect Flightcontrol to your Spring Boot Git repository, create a new Flightcontrol project.
In the dashboard, click on your Spring Boot repository in the list of Git repositories:

After choosing the Spring Boot project, you’ll get the “Prepare for Launch” screen. You can keep the name of your project the same as the name of your Git repository, or you can change the name.
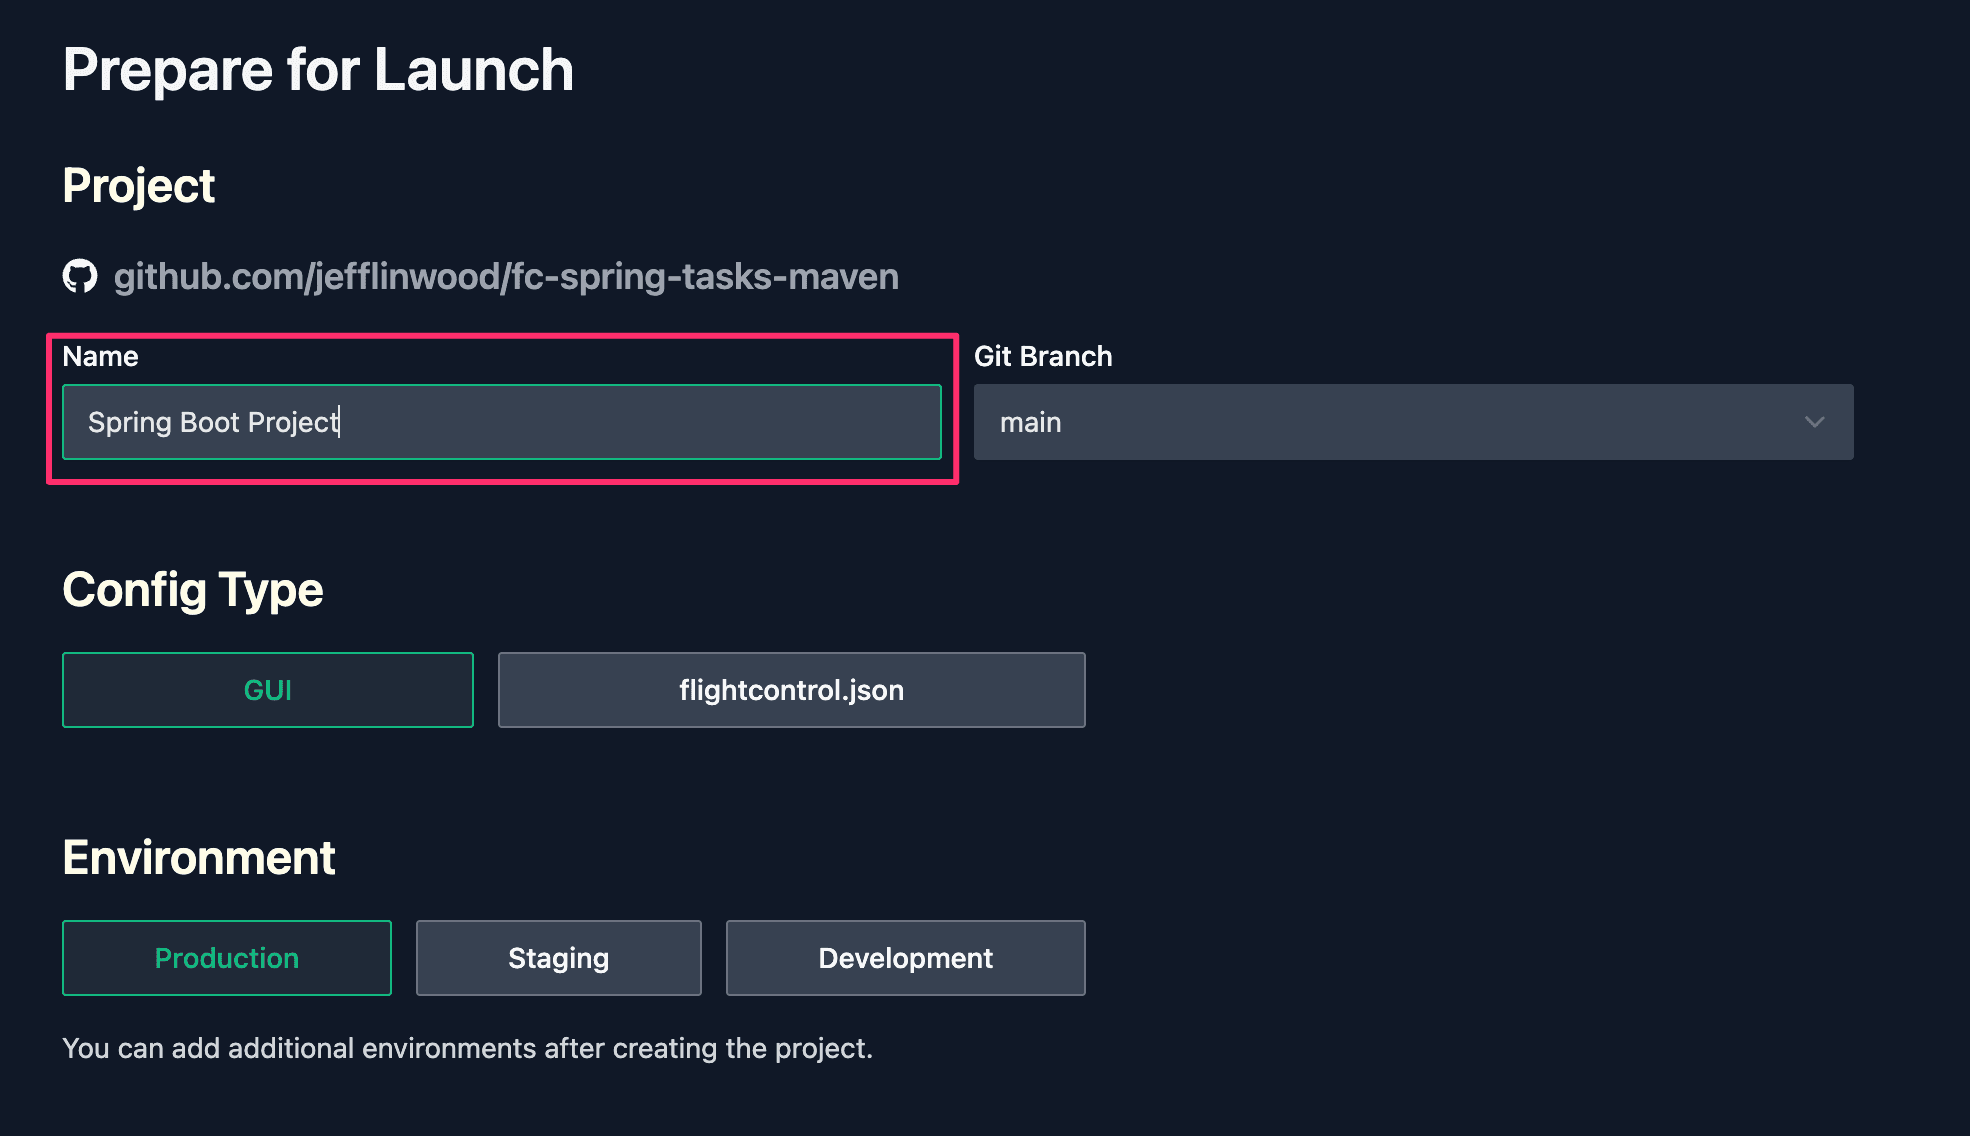
We’ll name our project “Spring Boot Project”.
Setting up a Flightcontrol Environment
Every Flightcontrol project has at least one environment. Each environment contains a set of Flightcontrol services to run your Spring Boot application.
For example, you might have a staging environment and a production environment. If you want to use separate AWS accounts for different environments, you will need to create separate Flightcontrol projects, each with their own environment. For more, see our guide on Multiple AWS Accounts.
We will create one project, with one environment, and our environment will be “Production”.
Choosing a Configuration Type
For the configuration type, we will choose to use the “GUI” method to use the Flightcontrol dashboard to set up our project. The other configuration type is to put a flightcontrol.json file in your repository. Both are equally supported, but the GUI method is easier to get started with.
Creating Services
Inside the environment, we’ll need to create two services - one web service to run the Spring Boot application, and one database service to run the MySQL or Postgres database.
If your Spring Boot application uses Redis or has a worker process, you can also create additional services for these types.
Creating a Web Server Service
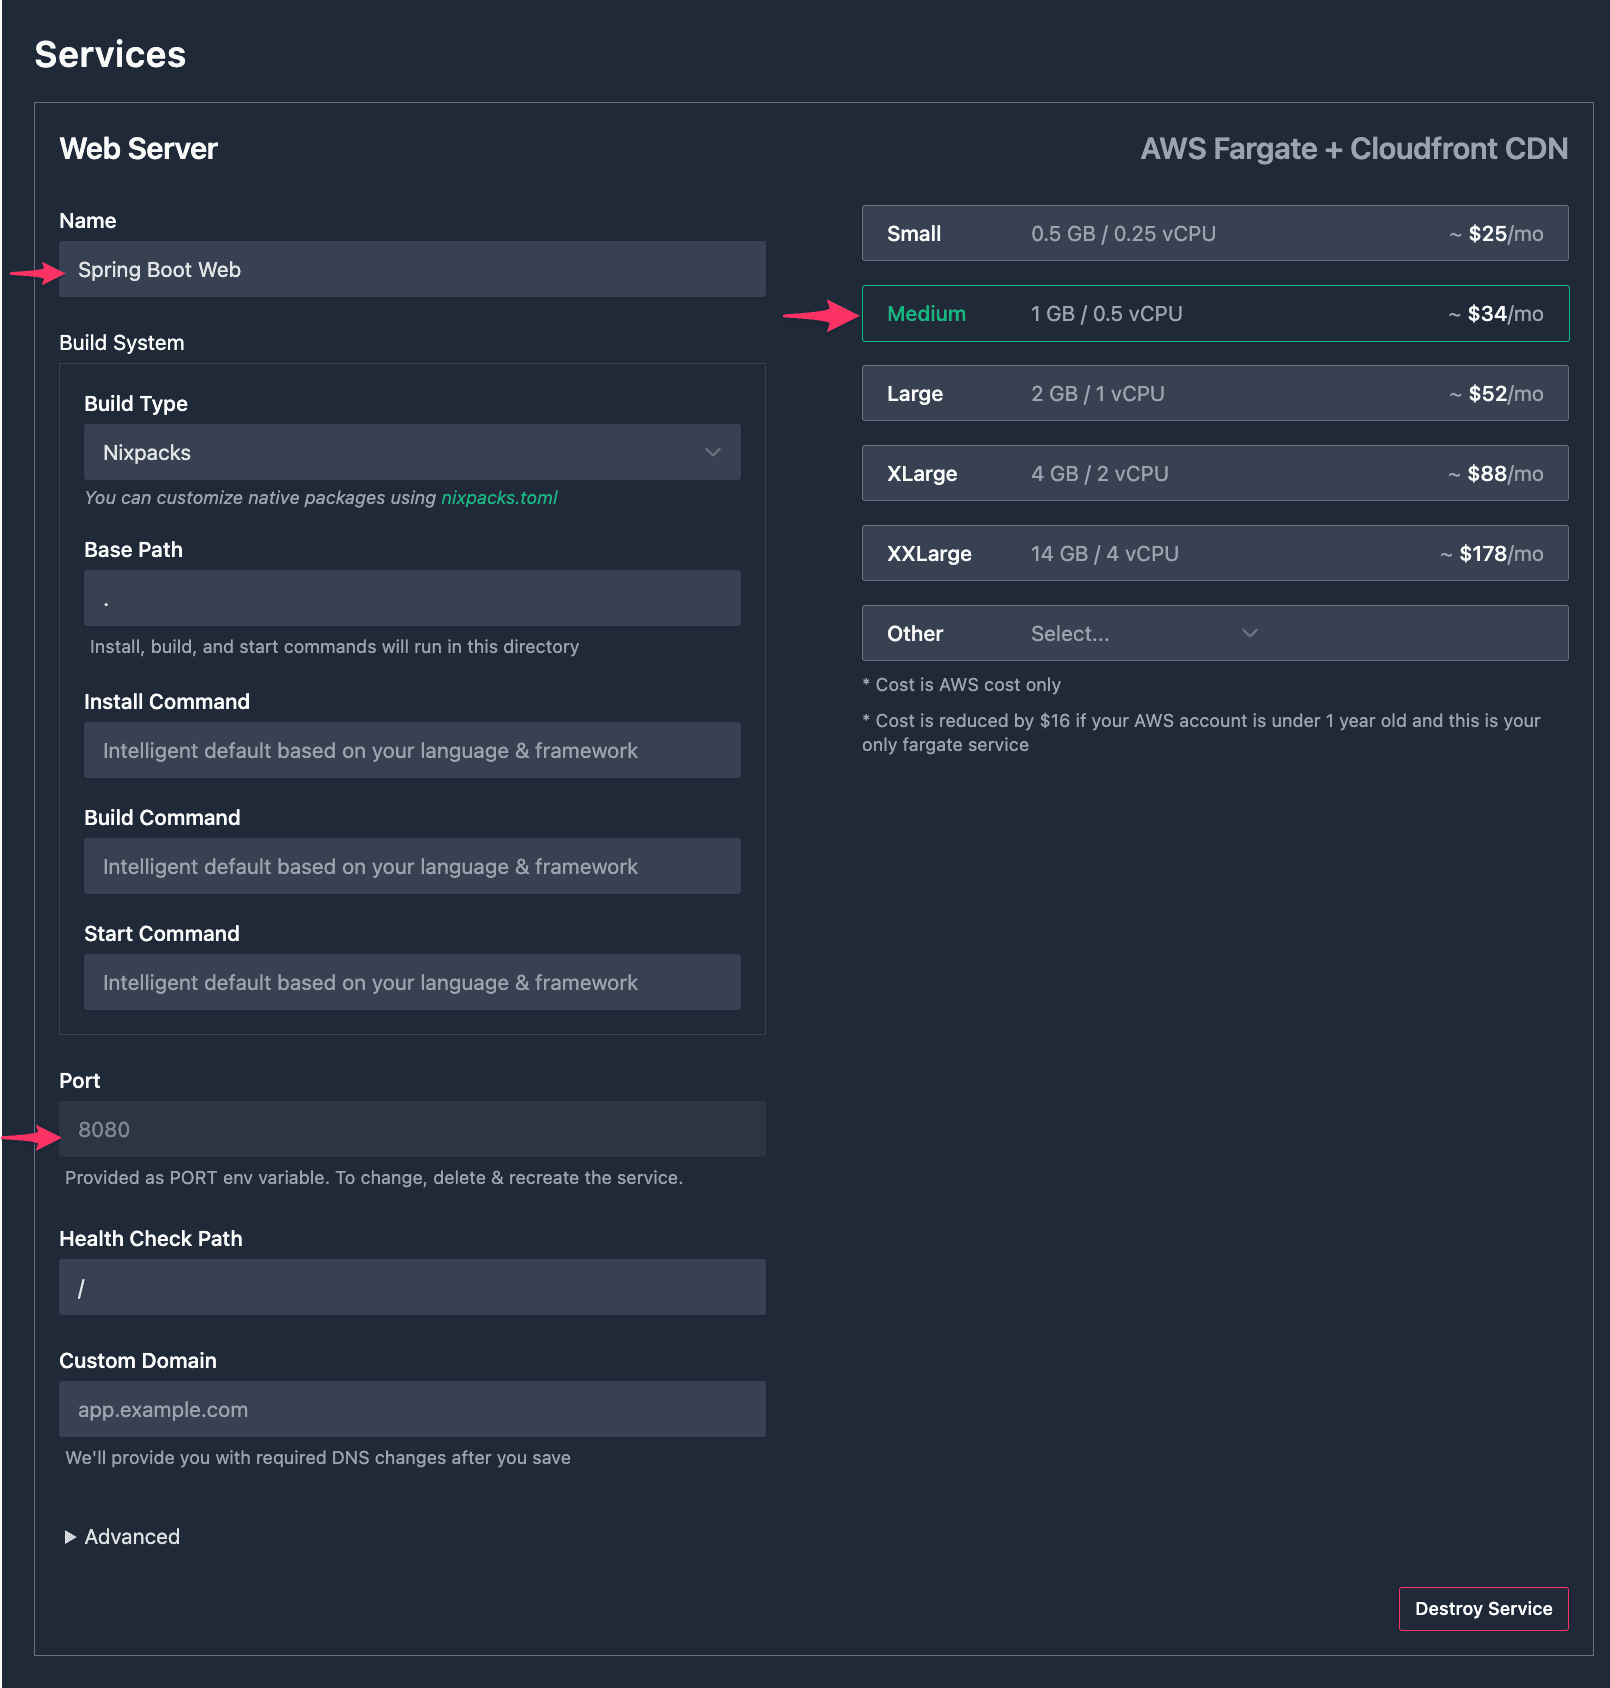
In the list of Flightcontrol services, click on “Add Web Server” to create a new web server to run your Spring Boot Application.

There are three changes we need to make:
- Naming the Service (example: “Spring Boot Web”)
- Change the port to
8080 - Choosing an instance size of Medium or higher
The first change is to name our service - we’ll name it “Spring Boot Web”. This is used for display by Flightcontrol.
The second step is to change the port setting from 3000 to 8080 to match the port that Spring Boot uses by default.
Our last step is to choose an instance size of Medium or higher. The Small instance size does not provide enough memory for a Spring Boot application to run. If your Java application is complex, you may want to consider a Large instance size or higher.
After you finish creating your project, Flightcontrol will use these settings to kick off a build for your Spring Boot application to create a Docker image. Flightcontrol then deploys the Docker image to the AWS Elastic Container Service (ECS) service.
Your web application will be available on a public URL, and you can customize the domain name to be one you already own. See our guide on Custom Domains for more.
Creating a Database Service
Your Spring Boot application also needs a relational database - either MySQL or Postgres. Flightcontrol supports both through the AWS Relational Database Service (RDS).
Add a database service by clicking on “Add Database (RDS)” in the list of Flightcontrol services.

Within the database configuration, you can choose to use MySQL or Postgres. You can also choose what size of database to use, as well as the specific database version.
After configuring a database with Flightcontrol, the default behavior is that the DATABASE_URL environment variable contains the connection string for the RDS database.
This DATABASE_URL environment variable is not directly read by your Spring Boot application, as it is not a JDBC URL. You can either add a small piece of code to parse this DATABASE_URL into a JDBC URL (as seen in the Using a DATABASE_URL Environment Variable section), or you can manually set a SPRING_DATASOURCE_URL environment variable yourself, based on the value of the DATABASE_URL environment variable that Flightcontrol provides.
Deploying your Spring Boot Application
Once your services are configured, and the environment variables are in place, you can deploy your Spring Boot application.
Choose an AWS Region to deploy in (such as us-west-1) - Flightcontrol supports all AWS regions.
Click the “Create Project” button underneath the “Environment Variables” section and Flightcontrol will kickoff the deployment process.
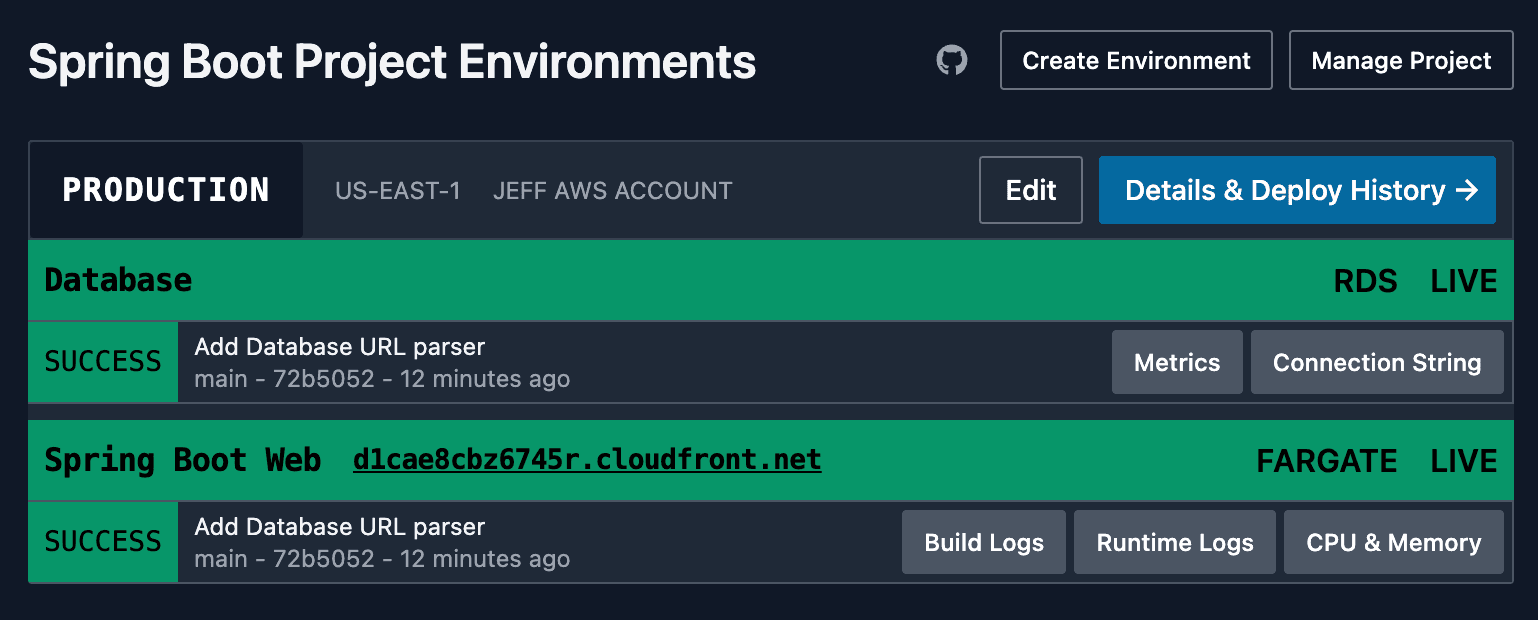
Flightcontrol creates two services on your AWS account - the ECS service for your Spring Boot application, and an RDS database instance.
Once deployment is complete, you will have a publicly accessible URL, secured with SSL.
If there are any problems, Flightcontrol will send an email notification to the email address associated with your Flightcontrol account. You can also track your progress on the dashboard.