Creating a Ruby on Rails Web Application
This tutorial takes you through the process of creating a new Ruby on Rails web application. We can deploy this build to AWS with Flightcontrol - those steps are covered in the Getting Started with Rails guide.
For those who are interested in learning more about the Ruby on Rails web framework, the best place to start would be the Ruby on Rails Getting Started guide. If you want to dive deeper into the Ruby language, the Ruby Programming Language page is a good place to learn more.
Prerequisites
Before you begin, you will need to have the following installed on your computer:
- Ruby 2.7.0 or higher
- Rails 7 or higher
- Postgres (you can use MySQL or MariaDB instead, but this tutorial will use Postgres)
Installation Guides for each of these:
You can’t use SQLite as your database with Flightcontrol, because it’s not supported on Amazon’s Relational Database Service (RDS). It’s a good idea to use the same database for local development and cloud deployment, so we recommend using Postgres (or MySQL or MariaDB) for both.
Creating a Rails Application
Let’s start by creating a new Rails application from the command line. You can do this with the rails command line tool.
rails new shop --database=postgresqlWe specify --database=postgresql because we want to use Postgres as our database. If you wanted to use MySQL or MariaDB, you would use --database=mysql as a command-line flag.
After running this command, you will likely get an error about a missing pg gem - this particular gem requires native extensions.
To install the pg gem, change directories into the shop directory that the rails tool just created and run bundle install
cd shop
bundle install
You will also need to install a Postgres distribution or the Postgres client libraries on your computer if they are not there already.
Rails also needs a development database to talk to. We can create this database with the rails db:create command. This does require that you have Postgres up and running locally first.
rails db:createYou should see some output similar to the following:
Created database 'shop_development'
Created database 'shop_test'
Now you’ve got Rails ready to run locally. The rails server command runs a local development server on port 3000.
rails serverOpen http://localhost:3000/ in your web browser, and you should see a page similar to the following:
Seeing this web page means that you have Ruby on Rails installed and working correctly.
Adding Scaffolding to the Rails Application
Let’s add a few pages and a database model to our application before we deploy it to AWS with Flightcontrol.
Press Ctrl and then C (also known as Ctrl-C) to quit the Rails server application and return to the command line.
We can use the Rails scaffold tool to quickly add these pages to our application. The scaffold tool will create a model, a controller, a database migration, and a set of views for us.
Our project will be a simple online store, so we’ll need a model for the things we sell. We’ll call this model Item.
We’ll also need to tell Rails which fields we want in the Item model.
rails g scaffold Item name:string description:text price:decimal
rails db:migrate
You should see some output similar to the following:
== 20230406193105 CreateItems: migrating ======================================
-- create_table(:items)
   -> 0.0055s
== 20230406193105 CreateItems: migrated (0.0055s) =============================
In the routes.rb file, we need to add a route to replace the default Rails landing page. The scaffold command already added a resources :items line. That line adds routes for each of the CRUD actions we need for our Item model.
We do need a new home screen for our application, however. Replace the commented out root "articles#index" line with root "items#index" to match our model’s name.
Rails.application.routes.draw do
  resources :items
  # Define your application routes per the DSL in https://guides.rubyonrails.org/routing.html

  # Defines the root path route ("/")
  root "items#index"
end
Run rails server again, and you should see a page similar to the following:
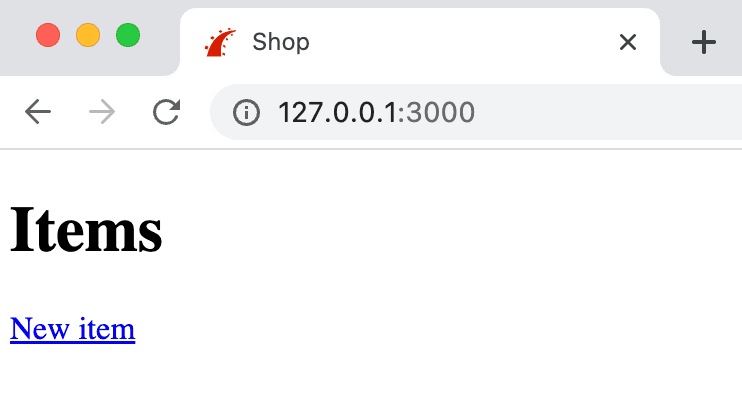
Go ahead and add a new item or two to your project if you want, just to verify that everything works ok.
Adding the Rails Project to GitHub
Flightcontrol works with Git repositories to deploy your code base. If you don’t have a GitHub account, you can create one at https://github.com.
Create a new, empty repository on your GitHub account and then push your Rails project to GitHub.
You can push your code from the command line with the following commands:
git add .
git commit -m "Initial commit"
git remote add origin YOUR_GITHUB_REPO_URL
git push -u origin main
Your repository can be either private or public for Flightcontrol to work. If you have control over the repository, Flightcontrol can listen for changes to your repository and automatically deploy your application when you push new code. Public open source repositories are also supported, but you would need to trigger manual deployments.
Deploying a Rails Application with Flightcontrol
Now that you have a Rails web application created, you can deploy it with Flightcontrol. Visit our Getting Started with Rails guide to get everything set up.