Deploying a Laravel Application with Flightcontrol
This guide will walk you through deploying a Laravel application to Amazon Web Services (AWS) using Flightcontrol. You should have a Laravel application up and running locally before you begin.
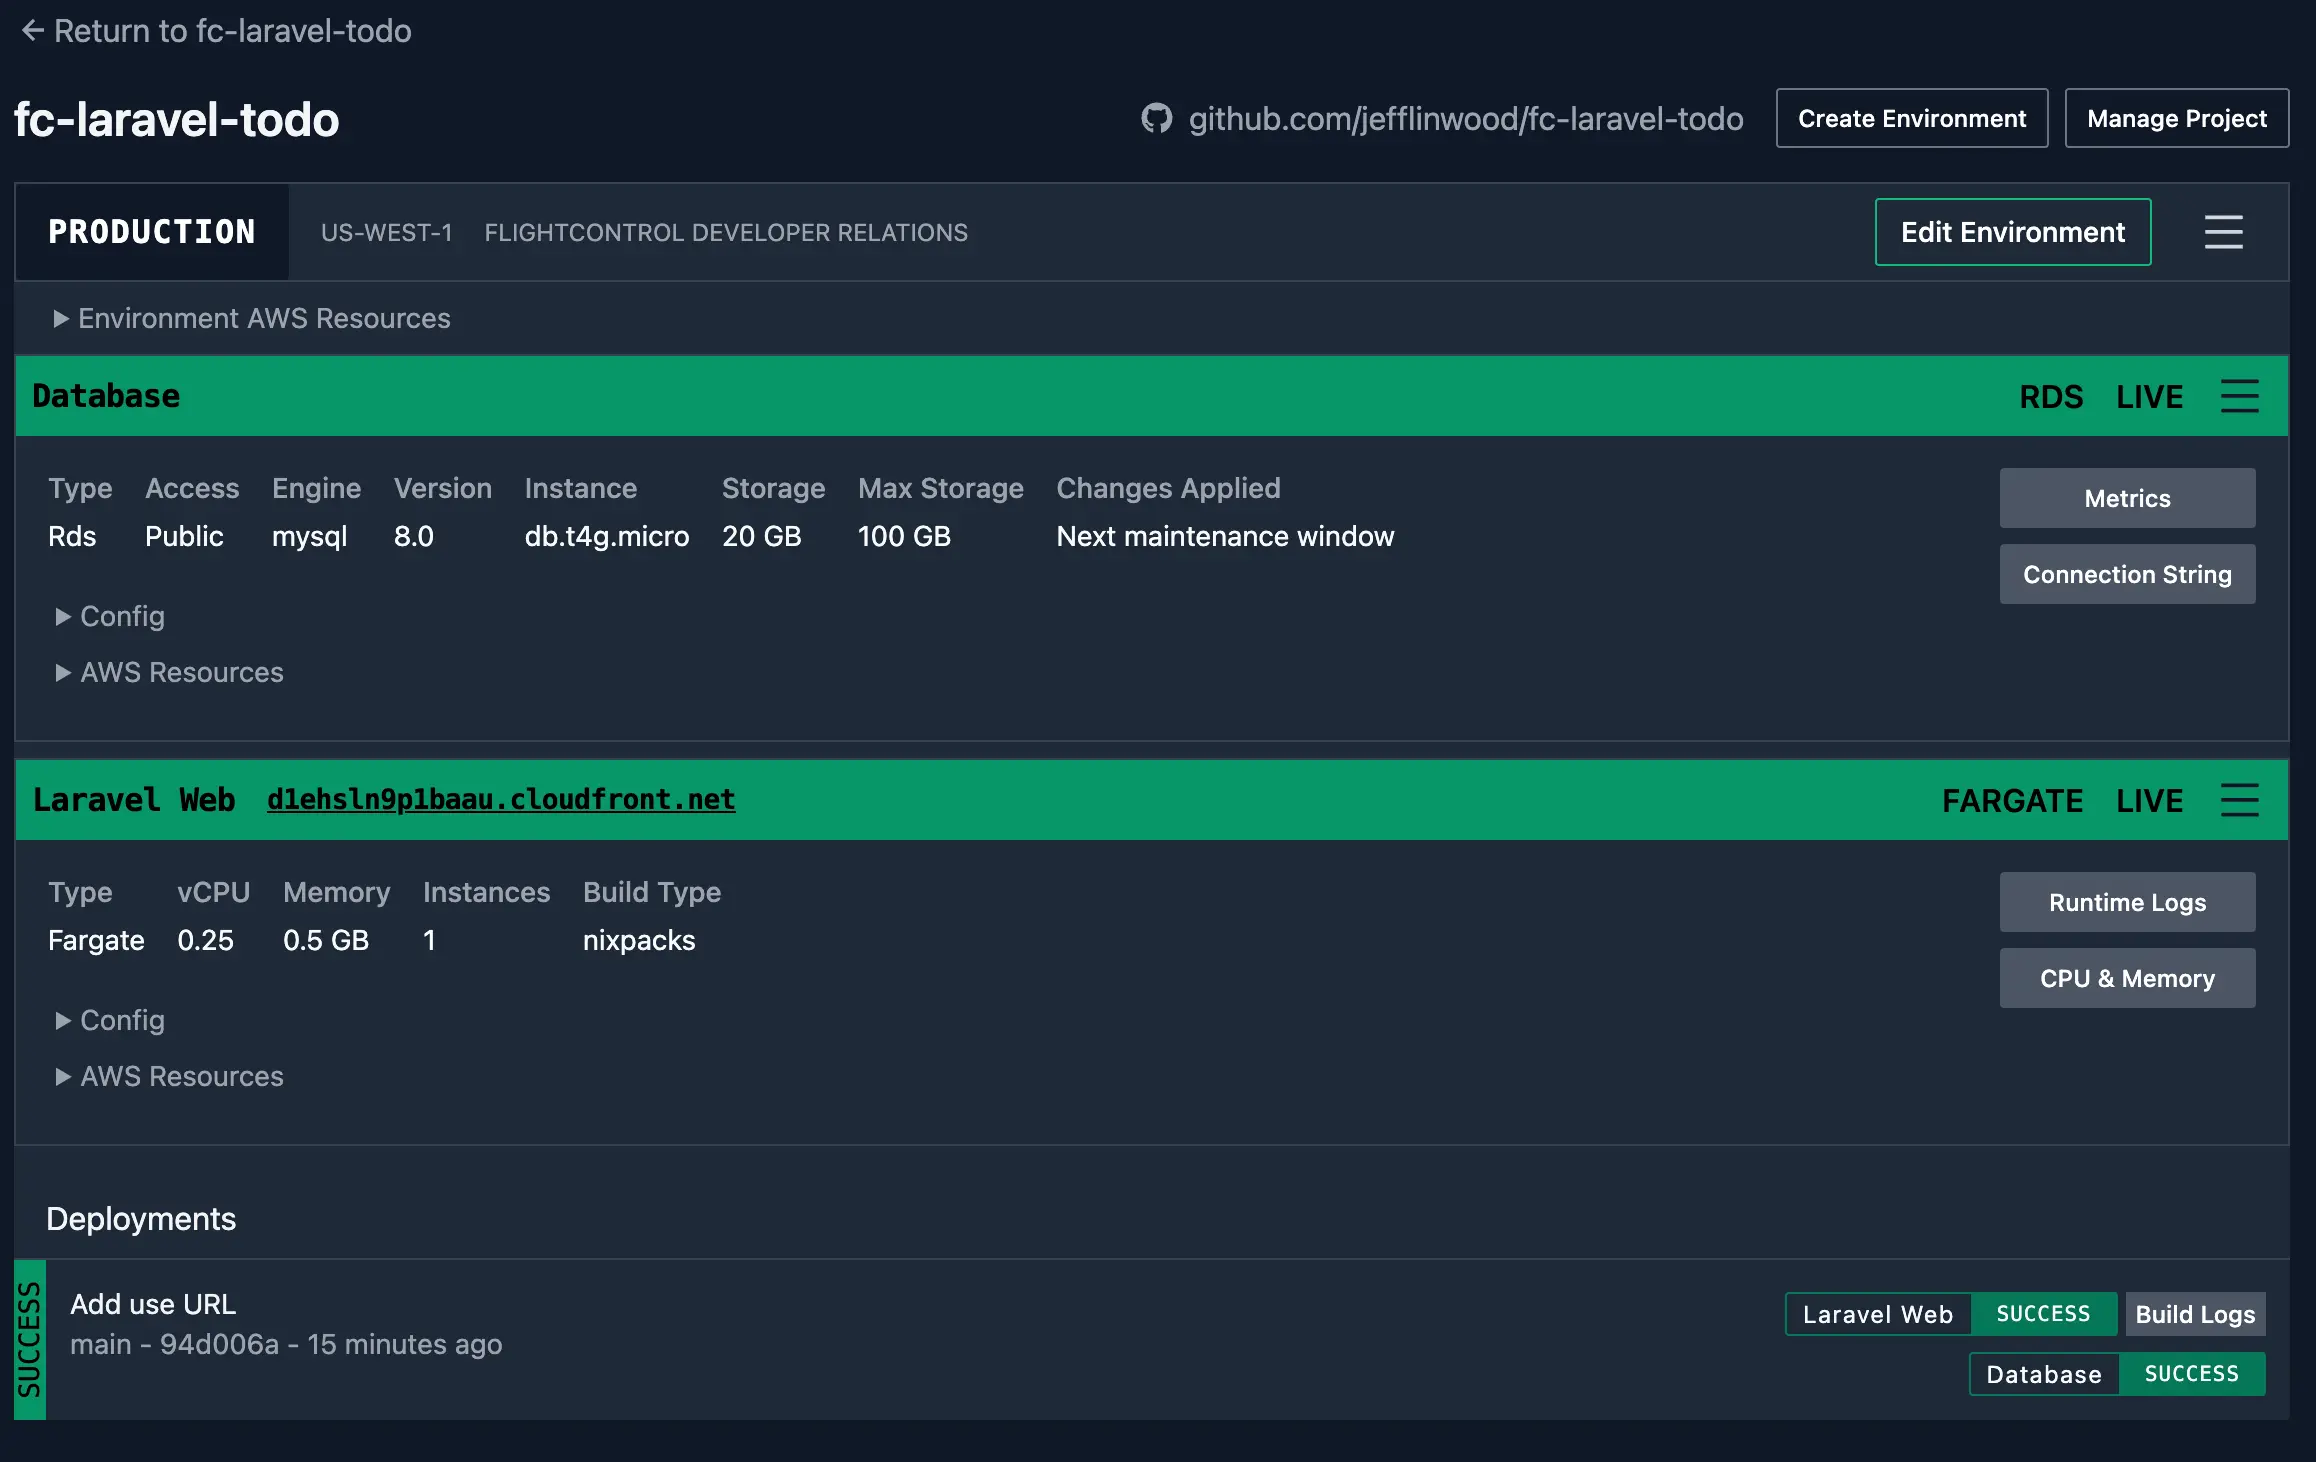
When we are done, we will have a Laravel application (with Nginx as a web server) running on AWS Elastic Container Service (ECS) and an AWS Relational Database Service (RDS) database. This web application will have a publicly accessible URL, and will run on your own AWS account.
To deploy your web application, we use the Nixpacks build pack for PHP to take your source code and turn it into a Docker image. Part of the build process adds an Nginx web server that sits in front of your Laravel web application.
You can customize the web server’s behavior with an nginx.conf file, or you can provide your own nginx.template.conf file. Your template file would use the same structure that you would find in this Nginx Template from the Nixpacks PHP Provider.
Modifying your Laravel Application to serve HTTPS
Your Laravel application will need to use HTTPS URLs in production. Because the Secure Sockets Layer (SSL) is terminated at the AWS load balancer, your Laravel application thinks that it runs on HTTP.
One way to address this issue is to tell Laravel to always use HTTPS URLs in production. You can do this by adding the following snippet to the boot() method in your AppServiceProvider.php file:
public function boot(): void
{
    // Always use HTTPS URLs in production
    if ($this->app->environment('production')) {
        URL::forceScheme('https');
    }
}
There are other approaches, such as detecting the headers sent from the load balancer, but this is the simplest approach, and also works on other cloud providers for portability.
Prerequisites
You’ll need the following before you begin:
- A Laravel application to deploy
- A Git repository (public or private) with the Laravel application
- An AWS account - Create an account
- A Flightcontrol account - Create an account
Connecting Flightcontrol to AWS and GitHub
After you have created your Flightcontrol account, you’ll need to connect your AWS and a Git provider account. The AWS account will be used to create the infrastructure for your Laravel application. Your Git provider account will be used to deploy your Laravel application to AWS.
If you’re using GitHub, you can choose to grant Flightcontrol access to selected or all repositories. If you choose selected access, you’ll need to select the repository that contains your Laravel application. For more, see our guide to Connecting Git provider.
Creating a Flightcontrol Project
Once you connect Flightcontrol to your Laravel Git repository, you can create a new Flightcontrol project.
In the dashboard, click on your Laravel repository in the list of repositories:
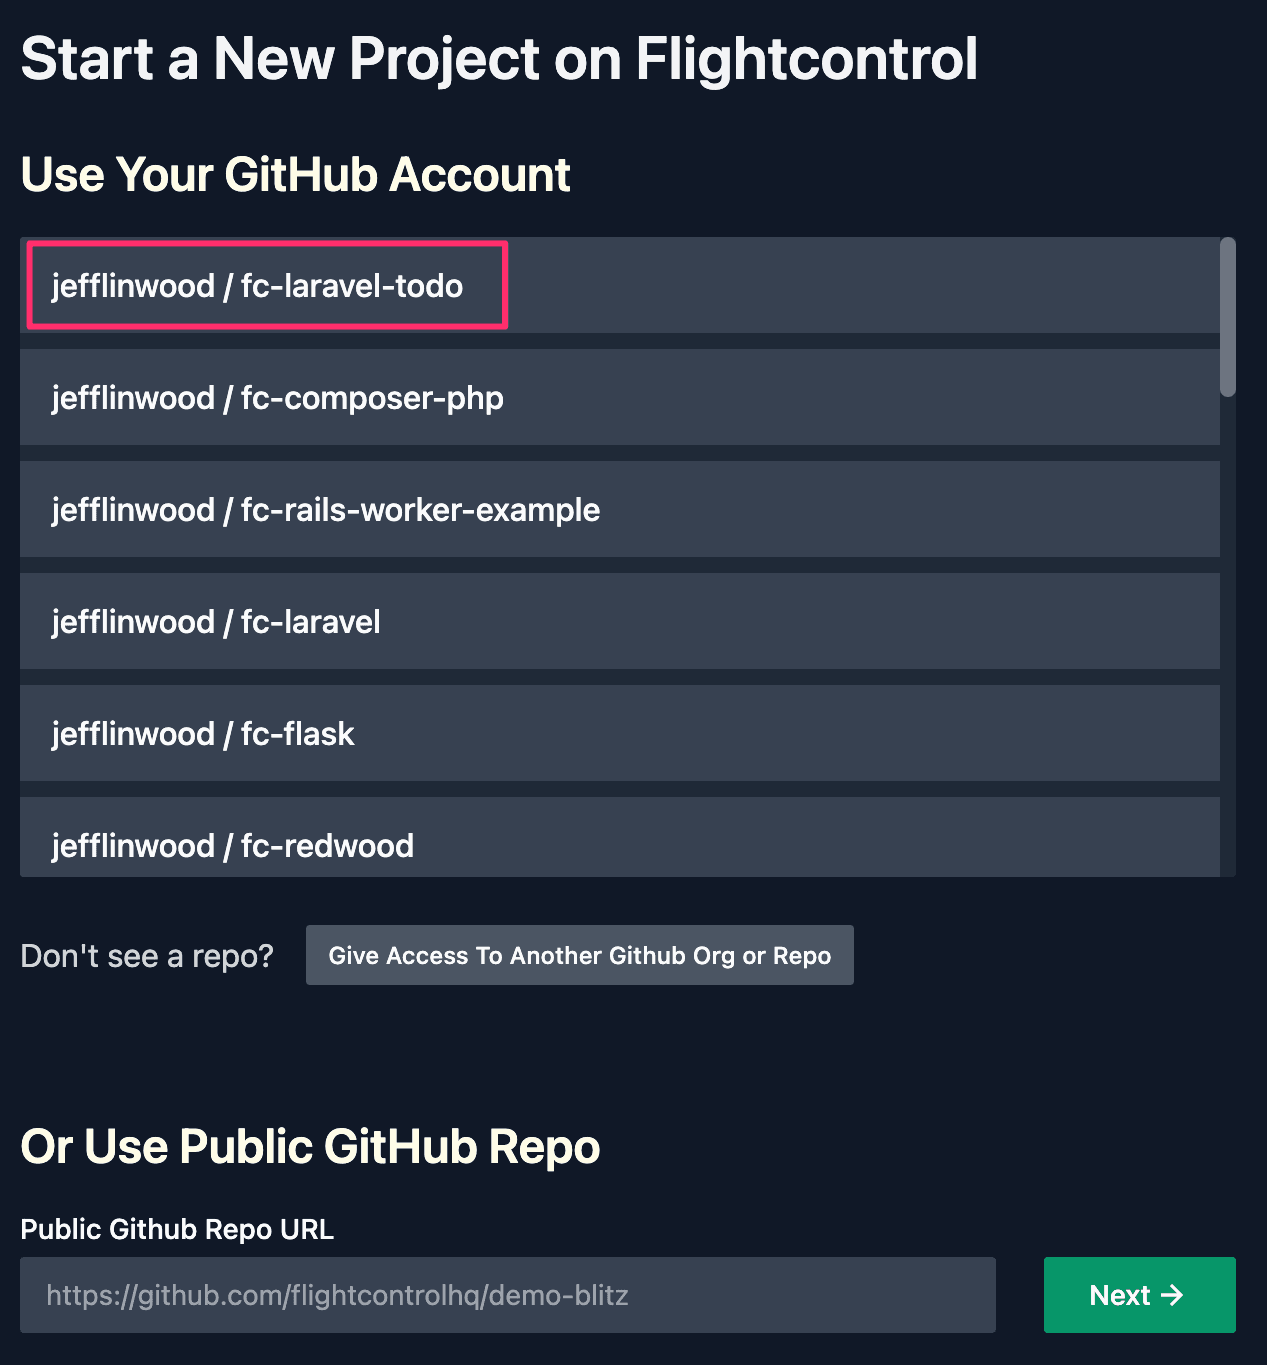
After choosing a repository, you’ll get the “Prepare for Launch” screen. You can keep the name of your project the same as the name of your Git repository, or you can change the name.
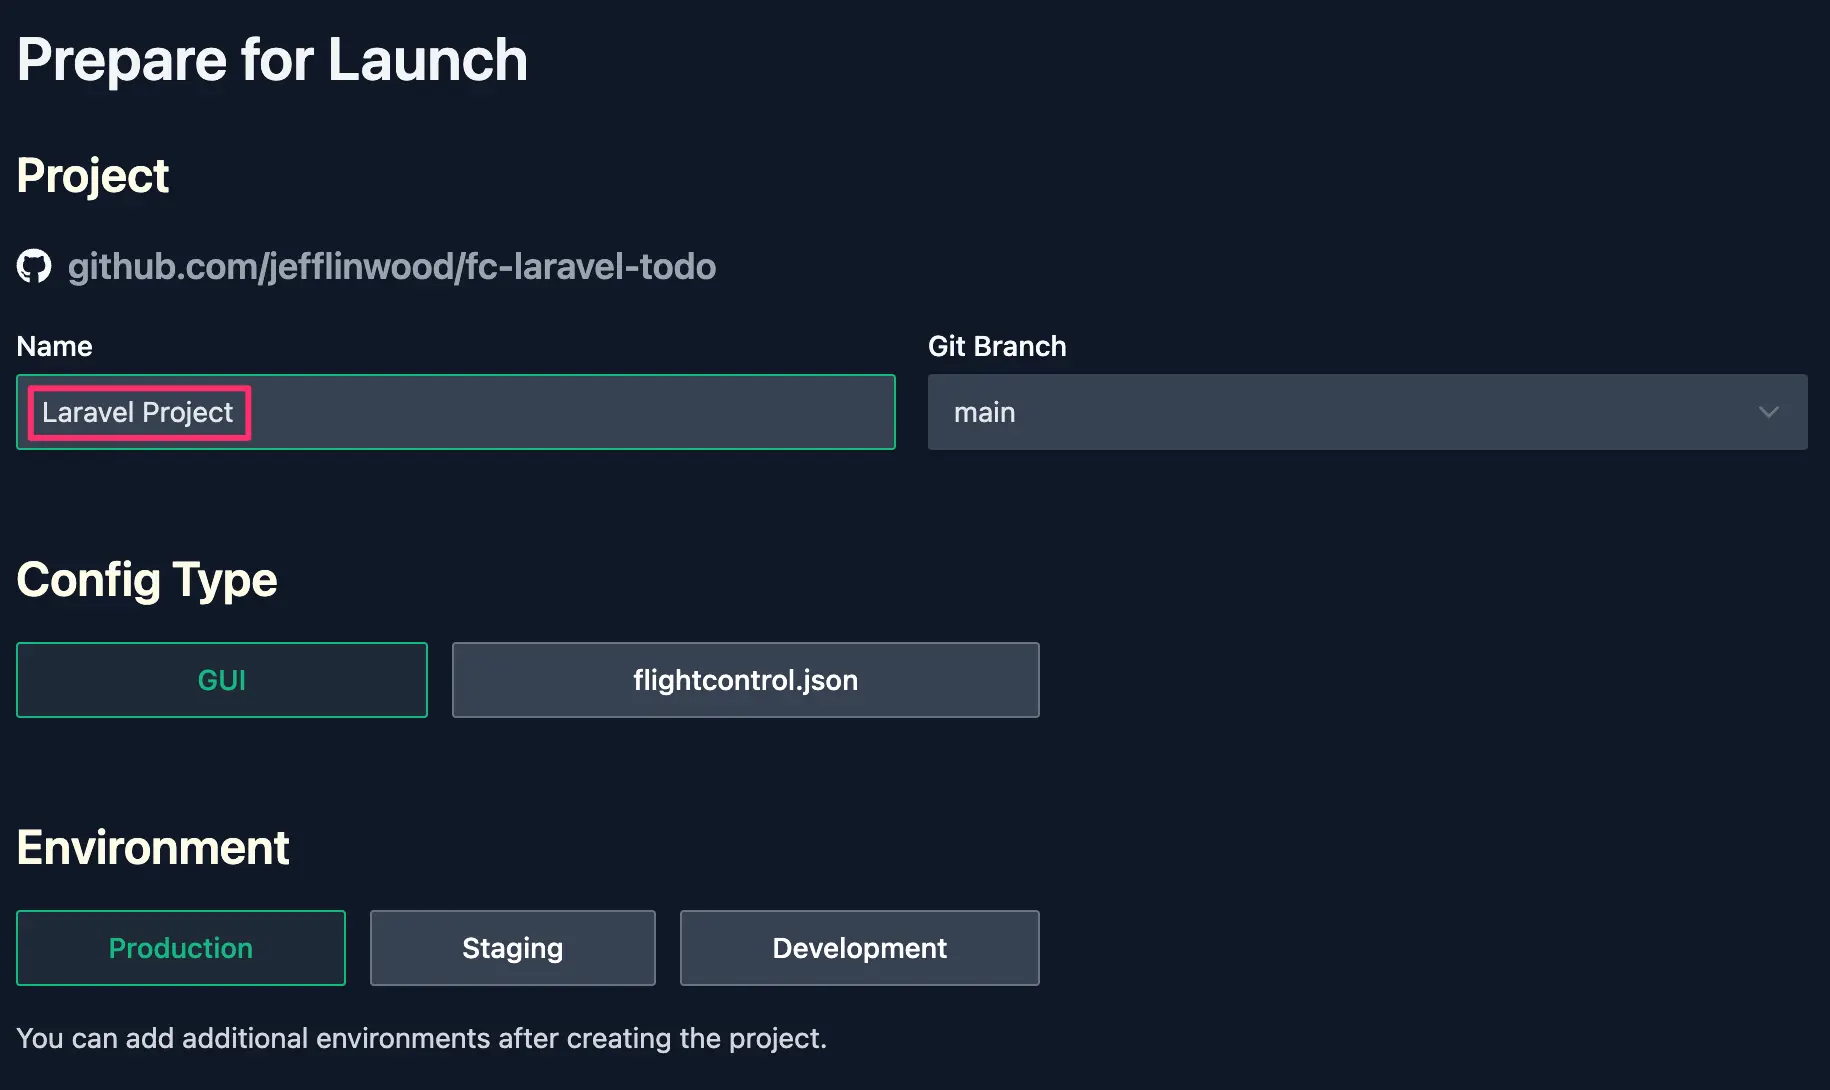
We’ll name our project “Laravel Project”.
Setting up a Flightcontrol Environment
Each Flightcontrol project contains one or more environments.
An environment is a set of Flightcontrol services that are used to run your Laravel application.
For example, you might have a staging environment and a production environment. If you want to use separate AWS accounts for different environments, you will need to create separate Flightcontrol projects, each with their own environment. For more, see our guide on Multiple AWS Accounts.
We will create one project, with one environment, and our environment will be “Production”.
For the configuration type, we will choose to use the “GUI” method to use the Flightcontrol dashboard to set up our project. The other configuration type is to put a flightcontrol.json file in your repository. Both are equally supported, but the GUI method is easier to get started with.
Inside the environment, we’ll need to create two services - one web service to run the PHP/Laravel application and Nginx web server, and one database service to run the MySQL or Postgres database.
If your Laravel application uses Redis or has a worker process, you can also create additional services for these types.
Creating a Web Server Service
In the list of Flightcontrol services, click on “Add Web Server” to create a new web service.

The Flightcontrol web service runs your Laravel application along with the Nginx web server. Flightcontrol will kick off a build for your application to create a Docker image. Flightcontrol then deploys the Docker image to the AWS Elastic Container Service (ECS) service. Your web application will be available on a public URL, and you can customize the domain name to be one you already own. See our guide on Custom Domains for more.
Within the Web Service configuration, you have several options to customize the way Flightcontrol builds and deploys your code. Flightcontrol uses Nixpacks to build and run your code. Nixpacks are a modern form of build packs that infers what type of application you have from your code base. From that information, Nixpacks provides sensible defaults for installing, building, and running your application.
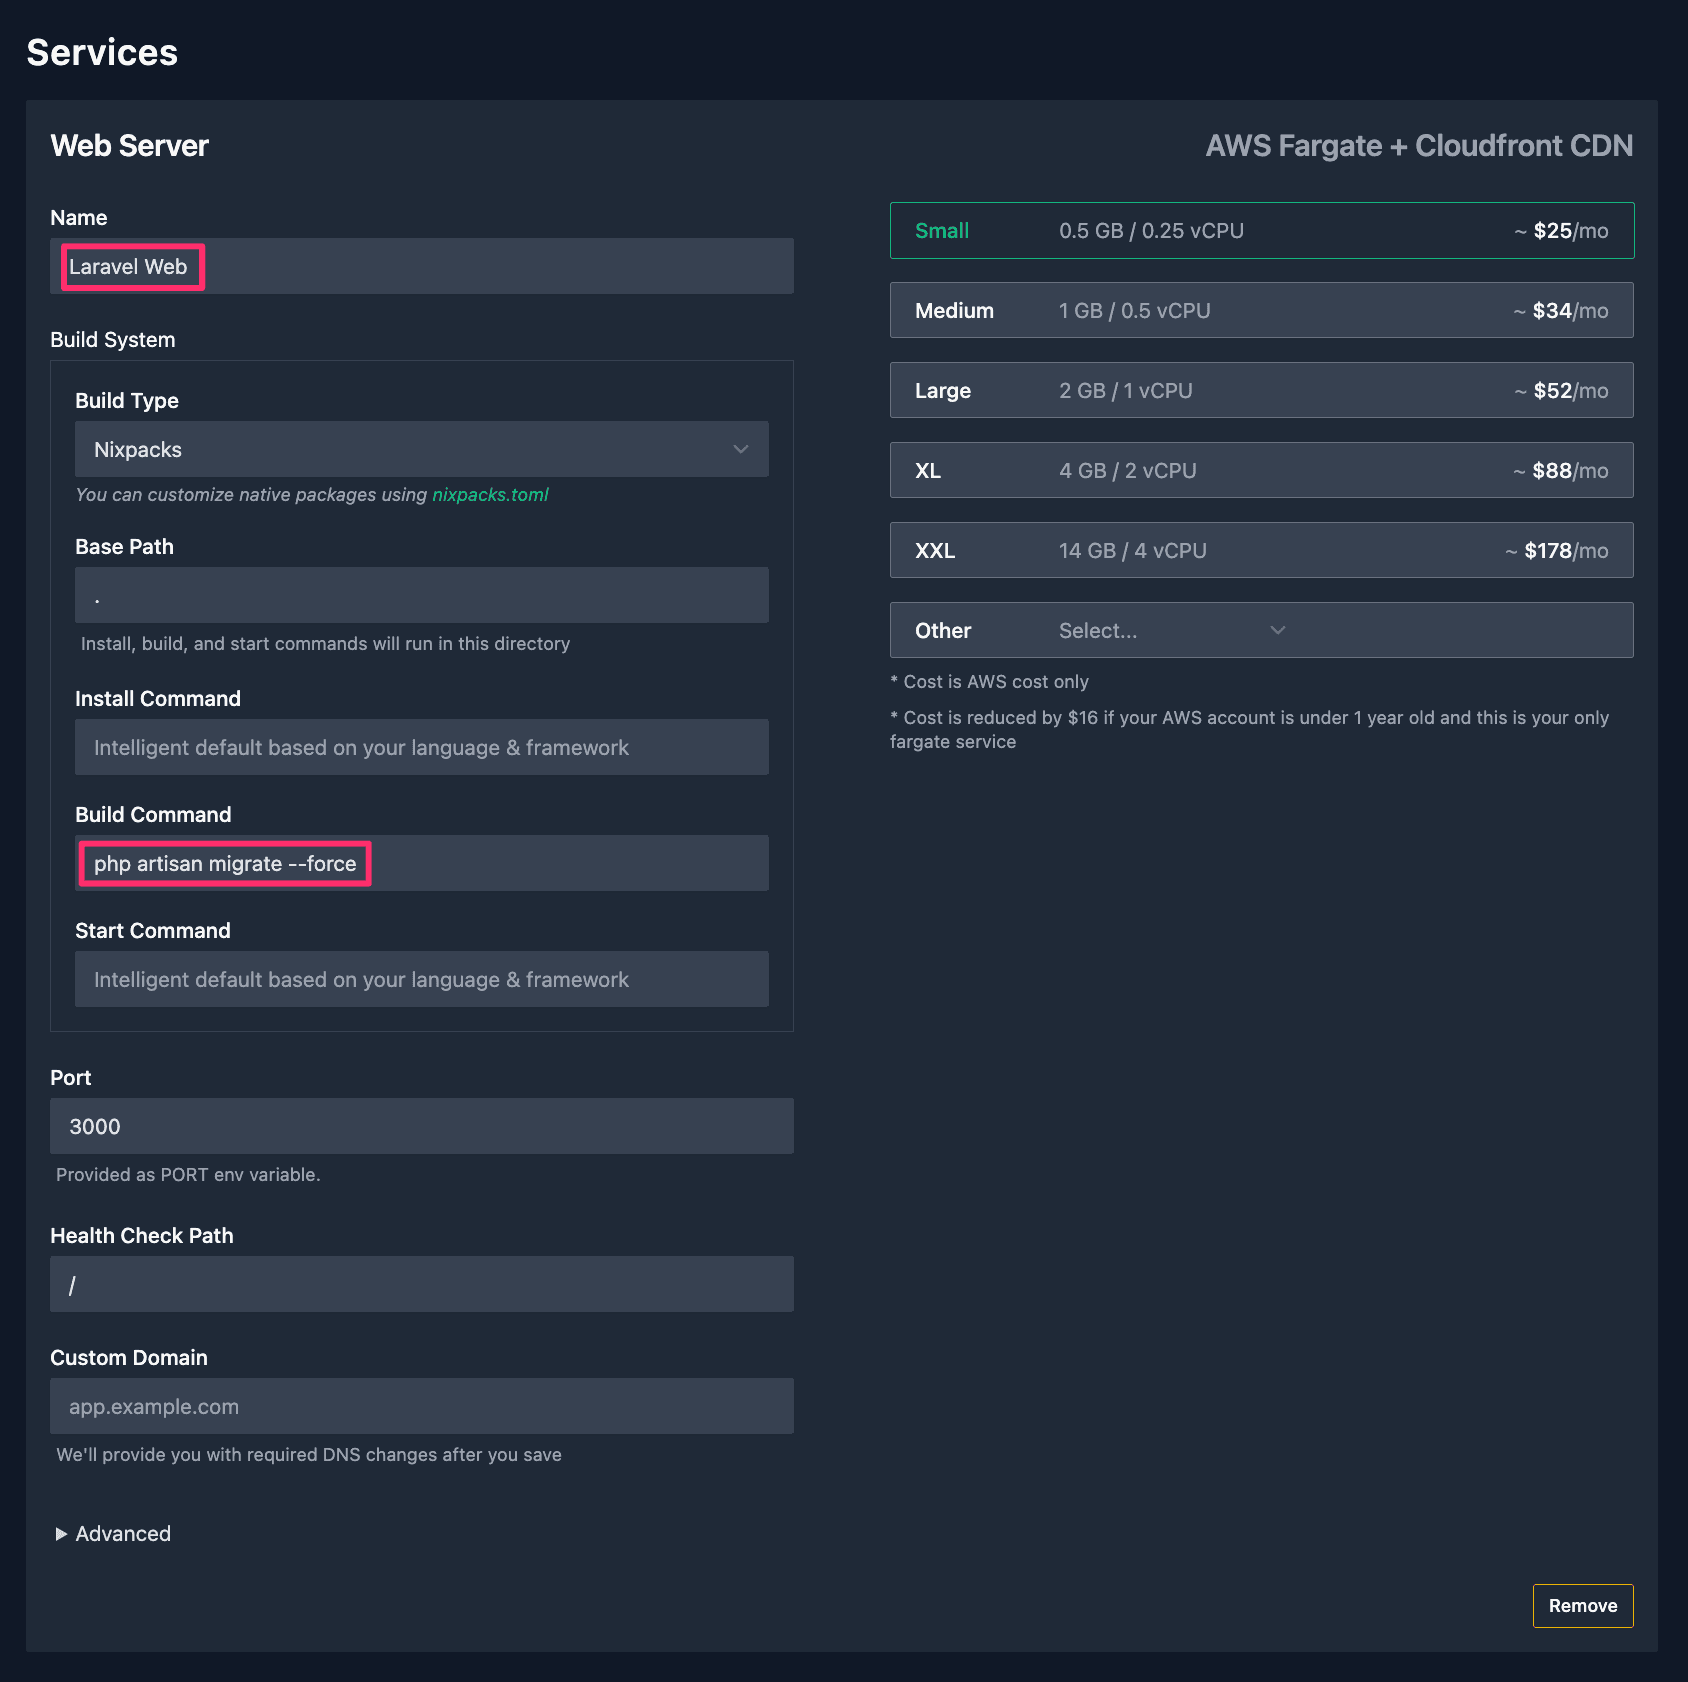
For Laravel, you will need to customize your own build command.
Typically, you will need to add a database migration step, so your build command will be:
php artisan migrate --forceYou may also need to include npm install or yarn install, depending on how you are building your JavaScript front end assets.
The build command in Flightcontrol would then look like:
npm install && php artisan migrate --forceYou should also add a name for your Flightcontrol service - in the example, the service is named “Laravel Web”.
Creating a Database Service
Your Laravel application also needs a relational database - either MySQL or Postgres. Flightcontrol supports both through the AWS Relational Database Service (RDS).
Add a database service by clicking on “Add Database (RDS)” in the list of Flightcontrol services.

Within the database configuration, you can choose to use MySQL or Postgres. You can also choose what size of database to use, as well as the specific database version.
After configuring a database with Flightcontrol, the default behavior is that the DATABASE_URL environment variable contains the connection string for the RDS database.
Your Laravel application will pick up this environment variable, unless you’ve changed the your application’s database.php file.
There are some environment variables that you do have to configure in Flightcontrol.
Setting up Environment variables
There are three environment variables that you have to set to get your Laravel application running with Flightcontrol.
- APP_KEY - the Laravel application key - found in your
.envfile, and different for each application. - APP_ENV - the Laravel environment - typically
production - APP_DEBUG - controls the Laravel debug mode - this should always be
falseon a publicly available application to avoid displaying sensitive information to a user.
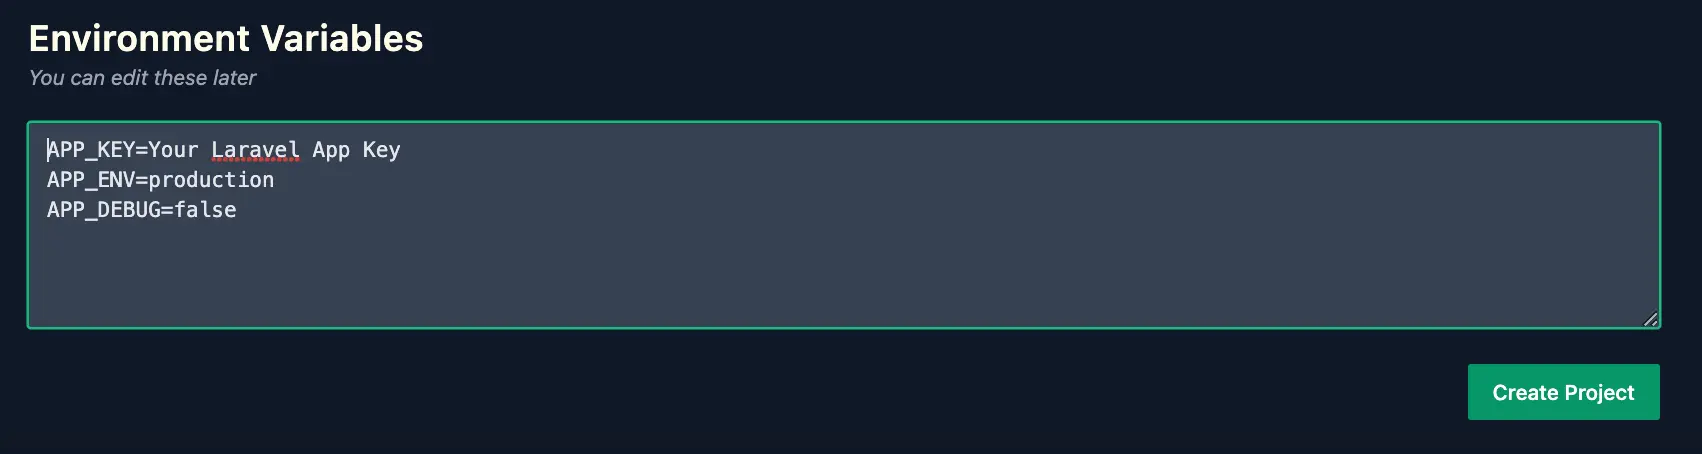
Your application may have other environment variables such as API keys that you can also include in the same place.
Deploying your Laravel Application
After setting up your Flightcontrol project, adding the two services, and setting the environment variables, you are ready to deploy your Laravel application.
Click the “Create Project” button underneath the “Environment Variables” section and Flightcontrol will kickoff the deployment steps.
This deployment process will provision and install two services on your AWS account - the ECS service for your Laravel application, and the RDS database service.
After a successful deployment, your Laravel application will be up and running on a publicly accessible URL.
If there are any problems, Flightcontrol will send an email notification to the email address associated with your Flightcontrol account. You can also track your progress on the dashboard.